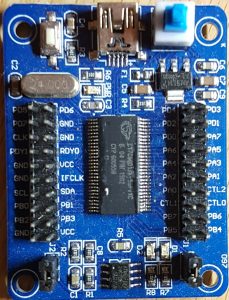
 I recently purchased a Geeetech (clone/knockoff) off ebay for a small $5, and wanted to test its functionality for use with my Flight Sim devices. The CY7C68013A is the same chip used in the Salae logic analyzer (and ripoffs), so figured it should have pretty decent performance.
Despite being used in quite a number of logic analyzer type projects, I couldn’t find any decent beginner information for it, so this will try and fill the gap; especially for windows users.
This first part post will describe settings up the environment, and the second post will delve into the features of this dev board and chip.
The CY7C68013A
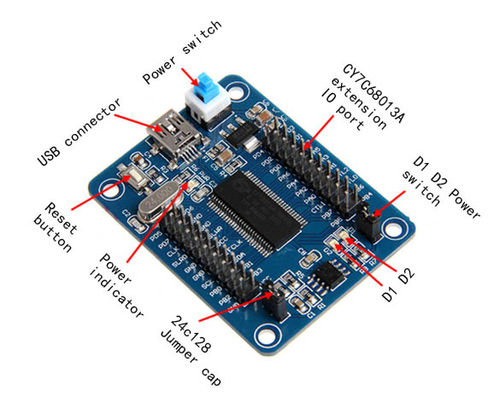
The chip board presents 20 GPIO ports (With 2 interrupt pins), a i2c bus, dedicated USB pins, and a couple of ancillary pins. Its work noting that the 56pin SSOP doesn’t have a serial port, which is a bit disappointing.
The board itself has 2 LEDS, D1 and D2 attached to the PA.0 and PA.1 ports respectively. This ties up both the interrupt pins, so will only be useful for initial testing.
Programming the chip is done via the EZ-USB software provided by Cypress (Or its open-source equivalent which only seems to be available on linux). The software can download a compiled .hex file directly to the RAM of the chip (Lost after reset), or the EEPROM provided and accessed via the i2c port. Data on the EEPROM will survive resets, but the chip must be disabled by adding J2 on the board before trying to reprogram it again.
Installing Software and Setting up Environment
- Install Cypress Dev Kit (CY3684Setup.exe)
- Install inf file from C:\Cypress\USB\CY3684_EZ-USB_FX2LP_DVK\1.1\Drivers\Win8.1\x64 (Go into folder for your OS version, right click on inf file, click install)
- Install the CY7C68013 Dev Tools from fx2lp.exe
- Plug in the Device, driver will auto install
- Install sdcc
- Install make
- Install TortoiseSVN (Optional)
- Install Eclipse (Install with C/C++ Development)
- Edit system path:
- Run “C:\WINDOWS\System32\control.exe system”
- Goto Advanved system settings -> Environment Variables
- Edit ‘Path’; Add:
- C:\Program Files\SDCC\bin
- C:\Program Files (x86)\GnuWin32\bin
- C:\Cypress\USB\bin
Setting Up Eclipse and Importing Code
The credit for ‘gtfx2lplib’ must all goto here: https://github.com/ubixum/fx2lib
I’ve taken the code base from there, removed whats not needed and modified it to suit the Geeetech dev board. I’ve renamed the library to ‘gtfx2lplib’
- Download gtfx2lplib.zip
- Extract it somewhere
- Most up to date source available from NewioIT WebSVN
- Import gtfx2lplib into Eclipse:
- New -> Makefile project with existing code
- Once import, create build targets ‘all’ and ‘clean’ (If they dont exist)
- (Right click gtfx2lib, goto ‘Build Targets’ – Create; name one ‘all’, and one ‘clean’
Building Code and Deploying
Now we just have to build the code, and upload an example to the dev board. The below will write the code to the RAM, which will be lost after reset.
- Right click on the ‘all’ build target and build it
- Check the console to make sure everything compiled correctly
- Run CyConzole EZ-USB (Start menu or “C:\Cypress\USB\bin\CyConsole.exe EZ”
- Click on ‘Download’
- Goto examples\led\, select the led.hex file
- The file will be uploaded to the board, and the leds will start alternatively flash.
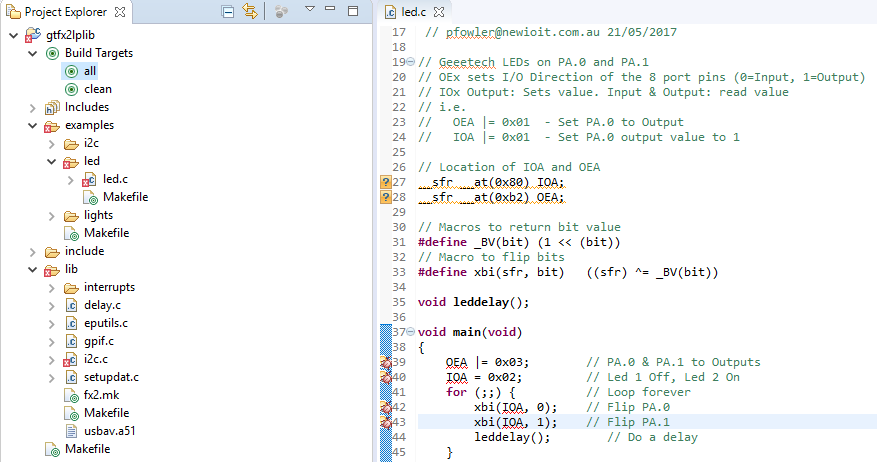
Led Code
Here is the code use for the ‘leds’ example. It deliberately doesn’t use the gtfx2lplib files as to allow a base example of whats happening. There is also the ‘lights’ code, which uses the library itself to run its functions.
// Geeetech LEDs on PA.0 and PA.1
// OEx sets I/O Direction of the 8 port pins (0=Input, 1=Output)
// IOx Output: Sets value. Input & Output: read value
// i.e.
//   OEA |= 0x01  - Set PA.0 to Output
//   IOA |= 0x01  - Set PA.0 output value to 1

// Location of IOA and OEA
__sfr __at(0x80) IOA;
__sfr __at(0xb2) OEA;

// Macros to return bit value
#define _BV(bit) (1 << (bit))
// Macro to flip bits
#define xbi(sfr, bit)   ((sfr) ^= _BV(bit))

void leddelay();

void main(void)
{
    OEA |= 0x03;        // PA.0 & PA.1 to Outputs
    IOA = 0x02;         // Led 1 Off, Led 2 On
    for (;;) {          // Loop forever
        xbi(IOA, 0);    // Flip PA.0
        xbi(IOA, 1);    // Flip PA.1
        leddelay();     // Do a delay
    }
}

// Some code to provide a delay
void leddelay()
{
    int i = 0,k = 0;
    for(i = 0;i < 1000;i++) {
        for(k = 0;k < 100; )k++;
    }
}
Deploying to EEPROM
To keep your code int eh device beyond a power down or reset, the code needs to be deployed to the EEPROM. To do so:
- Ensure jumper J2 is in place
- Reset the device (power cycle or press reset button)
- Remove jumper J2, this will enable the EEPROM, but as the chips is powered, it won’t read its code from it)
- Open EZUSB (Start menu or “CyConsole.exe EZ”
- Click on the ‘Lg EEPROM’.
- Navigate to examples\leds, select leds.iic, click ok
- EZUSB will now copy the code to the EEPROM instead of RAM
- Once complete, press the reset button. Code will be loaded from EEPROM
The above procedure must be repeated each time you wish to program the EEPROM (i.e. replace the jumper, reset, remove jumper, program. I find it easier to do inital development work using just RAM, and then program the EEPROM with code when im ready to more production style testing.